Shared Prompt Library
What are Shared Prompts
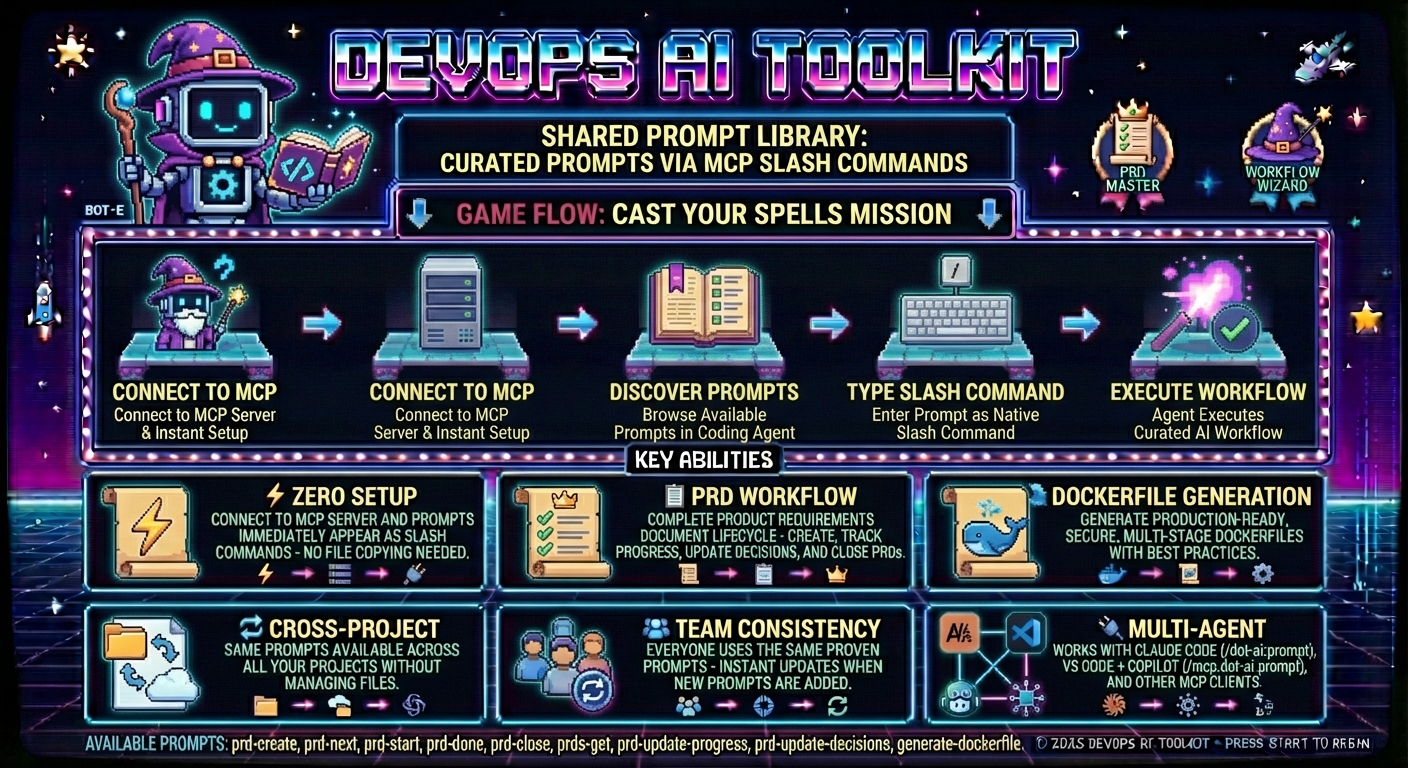
Shared Prompts provide a centralized way to share and discover prompts across projects and team members. Instead of manually copying prompt files between projects, prompts are served directly through the DevOps AI Toolkit and automatically appear as native slash commands in AI coding agents.
Key Benefits:
- Zero setup: Connect to the server and prompts are immediately available
- Native integration: Prompts appear as slash commands in your coding agent's command menu
- Cross-project sharing: Same prompts available across all projects without file management
- Instant updates: New prompts added to server are immediately available to all users
- Team consistency: Everyone uses the same proven prompts
Prerequisites
Before using Shared Prompts, you need:
- DevOps AI Toolkit deployed — see Deployment Guide
- Access via MCP client or CLI
Note: The Anthropic API key is only required for AI-powered tools (like deployment recommendations), not for using the shared prompts library.
How It Works
The DevOps AI Toolkit implements the standard MCP Prompts specification, exposing two key endpoints:
prompts/list: Returns all available prompts with metadataprompts/get: Returns specific prompt content by ID
When you connect to the server, your coding agent automatically discovers available prompts and makes them accessible through agent-specific interfaces. The access method varies by agent - some use slash commands, others integrate prompts as available tools.
See Shared Prompts in Action
This video demonstrates how to use the PRD (Product Requirements Document) prompts served by the DevOps AI Toolkit. Watch how to create, manage, and work through complete PRD workflows using the shared prompts library with conversational AI agents.
Using Shared Prompts
Discovering Available Prompts
- Ensure you're connected to the DevOps AI Toolkit (see MCP client setup)
- Access prompts using your agent's interface:
- Claude Code: Type
/and look for/dot-ai:prompt-namecommands - VS Code + GitHub Copilot: Type
/and look for/mcp.dot-ai.prompt-namecommands - Other agents: Check your agent's command menu or ask the agent to use specific prompts by name
- Claude Code: Type
- Browse available prompts through your agent's discovery interface
Executing Shared Prompts
Claude Code:
# Create a new PRD
/dot-ai:prd-create

# Get current PRD status
/dot-ai:prds-get
VS Code + GitHub Copilot:
# Create a new PRD
/mcp.dot-ai.prd-create

# Get current PRD status
/mcp.dot-ai.prds-get
Other Agents:
- May use slash commands with different formats
- Or ask the agent to use the prompt by name (e.g., "Use the prd-create prompt")
The prompt content executes exactly as if it were a local command file, but without any file management on your part.
Available Prompts
Project Management Prompts
prd-create
- Purpose: Create a comprehensive Product Requirements Document following documentation-first approach
- Use when: Starting a new feature that requires detailed planning, tracking, and documentation
- Example: Beginning work on a new feature or major enhancement
prds-get
- Purpose: Fetch all open GitHub issues with 'PRD' label from the current project repository
- Use when: Want to see all active Product Requirements Documents and their status
- Example: Getting overview of current project priorities and PRD status
prd-next
- Purpose: Analyze existing PRD to identify and recommend the single highest-priority task to work on next
- Use when: Need guidance on what to work on next within a PRD, uses smart auto-detection of target PRD
- Example: Continuing work on a PRD and need to prioritize remaining tasks
prd-start
- Purpose: Start working on a PRD implementation
- Use when: Beginning work on a specific PRD
- Example: Moving from planning phase to implementation phase
prd-update-progress
- Purpose: Update PRD progress based on git commits and code changes, enhanced by conversation context
- Use when: Implementation work has been completed and need to mark PRD items as done based on actual code changes
- Example: After completing development tasks, update PRD to reflect current status
prd-update-decisions
- Purpose: Update PRD based on design decisions and strategic changes made during conversations
- Use when: Architecture, workflow, or requirement decisions were made in conversation that need to be captured in the PRD
- Example: After making architectural decisions that affect the original PRD scope
prd-done
- Purpose: Complete PRD implementation workflow - create branch, push changes, create PR, merge, and close issue
- Enhanced PR Creation: Automatically detects and uses project PR templates (e.g.,
.github/PULL_REQUEST_TEMPLATE.md), analyzes git changes to auto-fill PR content, and prompts for information requiring human judgment - Template Integration: Works seamlessly with PR templates generated by the Project Setup tool
- Use when: Finished implementing a PRD and ready to deploy and close out the work
- Example: All PRD tasks completed and ready for final deployment and closure
prd-close
- Purpose: Close a PRD that is already implemented or no longer needed without creating a PR
- Use when: PRD functionality already exists (implemented elsewhere), PRD is superseded, or requirements changed
- Example: Closing a PRD whose features were already implemented in a separate project
Development Prompts
generate-dockerfile
- Purpose: Generate production-ready, secure, multi-stage Dockerfile and .dockerignore for any project
- Use when: Containerizing an application for production deployment, or improving an existing Dockerfile
- Example: Setting up Docker for a new project, or fixing security issues in an existing Dockerfile
generate-cicd
- Purpose: Generate intelligent CI/CD workflows through interactive conversation by analyzing repository structure and user preferences
- Use when: Setting up CI/CD pipelines that understand your project's existing automation (Makefile, npm scripts, etc.)
- Example: Adding GitHub Actions workflows that use your project's build system rather than raw commands
Example Workflows
Workflow 1: Complete PRD Lifecycle
-
Start new feature: Use
prd-createprompt to create comprehensive requirements document- GitHub issue created with PRD label
- PRD file generated with proper naming
- Complete documentation content written across multiple files with traceability
-
Check priorities: Use
prds-getprompt to see all active PRDs and priorities- Open PRD issues fetched from GitHub
- Issues formatted with status analysis
- Next steps recommendations provided
-
Begin implementation: Use
prd-startprompt to begin working on specific PRD- Target PRD auto-detected from context
- PRD readiness validated
- Feature branch created
- First implementation task identified with detailed plan
-
Get next task: Use
prd-nextprompt to identify highest-priority remaining work- Current PRD state analyzed
- Single highest-value next task identified
- Implementation design guidance provided
-
Update decisions: Use
prd-update-decisionsprompt when design decisions are made during implementation- Conversation context analyzed for design decisions
- Decision impact assessed across requirements and scope
- PRD sections updated with new decisions and rationale
-
Update progress: Use
prd-update-progressprompt after completing implementation tasks- Git commits and code changes analyzed
- Changes mapped to PRD requirements
- PRD checkboxes updated with work log entry
-
Finalize: Use
prd-doneprompt to deploy, merge, and close out completed work- Pre-completion validation performed
- Pull request created and merged
- GitHub issue closed with final validation
Workflow 2: Containerization
Video: Production Dockerfile Generation
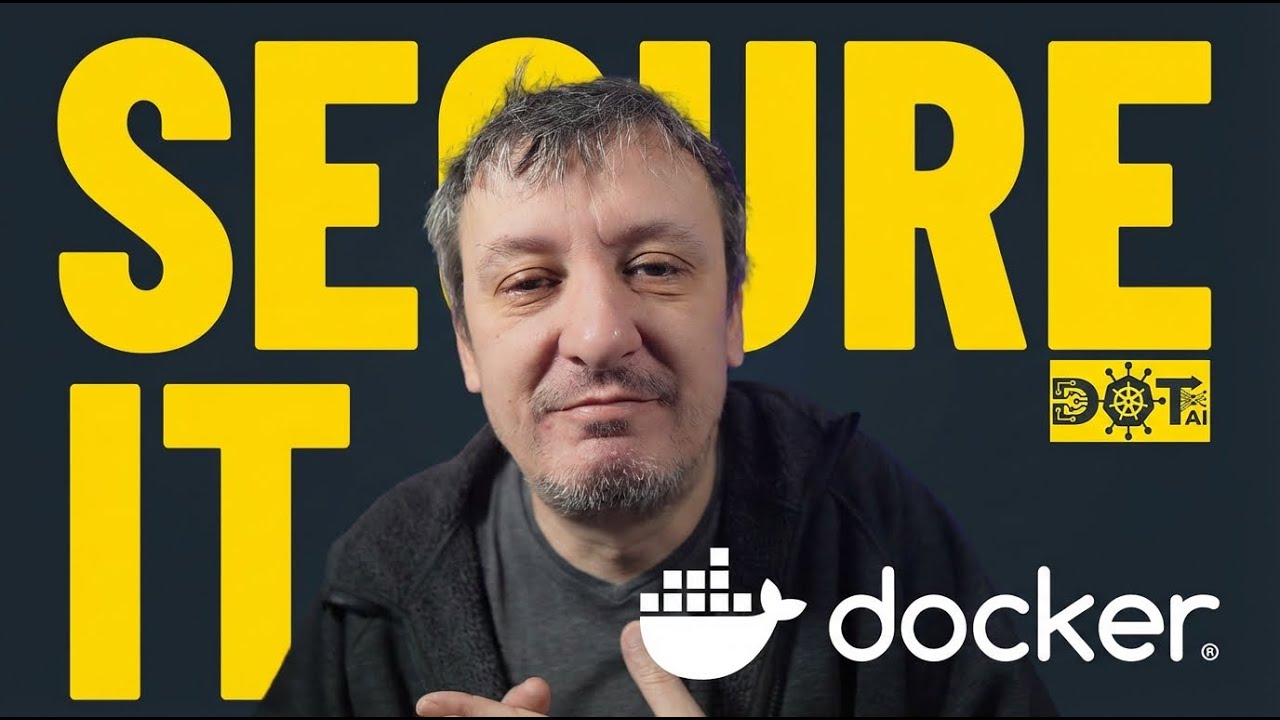
This video demonstrates how to use the generate-dockerfile prompt to create production-ready, secure, multi-stage Dockerfiles. Watch how the prompt analyzes your project structure and generates optimized Docker configurations following best practices.
-
Containerize project: Use
generate-dockerfileprompt to create production-ready Docker configuration- Project structure analyzed (language, framework, dependencies)
- Multi-stage Dockerfile generated with security best practices
- Minimal .dockerignore created based on Dockerfile's COPY commands
- Image built and validated automatically
- Container tested to ensure application runs correctly
-
Improve existing Dockerfile: Use same prompt when Dockerfile already exists
- Existing Dockerfile analyzed against best practices
- Security issues identified (running as root, :latest tags, etc.)
- Optimizations applied while preserving intentional customizations
- Changes explained with rationale
Workflow 3: CI/CD Generation
- Generate CI/CD workflows: Use
generate-cicdprompt to create intelligent workflows- CI platform confirmed (GitHub Actions supported, feature request offered for others)
- Repository analyzed (language, automation, existing CI, deployment mechanism)
- Findings presented for user confirmation
- Workflow choices presented (PR workflow, release triggers, deployment strategy)
- Workflows generated using project automation (npm test, make build, etc.)
- Required secrets and permissions documented
- Workflows committed and validated
Cross-Agent Compatibility
Supported Coding Agents
Agents with Full Slash Command Support: ✅
- Claude Code: Prompts appear as
/dot-ai:prompt-name - VS Code + GitHub Copilot: Prompts appear as
/mcp.dot-ai.prompt-name - Both support native slash command integration and prompt discovery
- Tools appear in agent configuration menus
- Full metadata support with descriptions
Other MCP-Compatible Agents: 🤔 Expected to work (not validated)
- Other MCP-compatible clients like Cursor should work since they follow MCP specifications
- Different agents may use different slash command formats (e.g.,
/mcp.dot-ai.prompt-namevs/dot-ai:prompt-name) - Help us validate: Try these prompts in your agent and report your experience via GitHub issues
Contributing Prompts
Have a useful prompt to share? Contribute it to the shared library:
- Fork the repository and create a feature branch
- Add your prompt to the
shared-prompts/directory following existing naming conventions - Update the documentation by adding your prompt to the "Available Prompts" section above
- Submit a pull request with a clear description of what the prompt does and when to use it
Prompt Metadata Format
Each prompt file must include YAML frontmatter that defines how it appears in coding agents:
---
name: your-prompt-name
description: Brief description of what this prompt does
category: project-management
---

# Your Prompt Content

Your prompt instructions go here...
Metadata Fields:
name: Becomes the slash command name (e.g.,name: prd-create→/dot-ai:prd-create)description: Shows up in coding agent command menus and help textcategory: Used for organizing prompts in documentation (must be one of:project-management,development)
How It Works:
- Prompt Discovery: Your coding agent automatically discovers all available prompts and their metadata
- Slash Commands: Each prompt appears as a slash command — the
namebecomes the command,descriptionappears in menus - Organization: The
categoryfield groups prompts in documentation for easy browsing
Contribution Guidelines:
- Use descriptive, kebab-case names (e.g.,
database-optimization,api-security-review) - Include clear purpose and usage examples in your PR description
- Test your prompt across different scenarios before contributing
- Follow the established prompt format and documentation patterns
User-Defined Prompts
Serve custom prompts from your own git repository. Your prompts appear alongside built-in prompts.
Why User-Defined Prompts?
- Agent-agnostic: Prompts work with any compatible coding agent (Claude Code, Cursor, VS Code, etc.) without maintaining separate prompt directories for each tool
- Team consistency: Share standard prompts across all projects without contributing to the core project
- Organization-specific workflows: Create prompts tailored to your team's processes
- Version control: Manage prompts through standard git workflows (commit, push, PR)
- Works everywhere: Prompts work across all Kubernetes deployments
Configuration
Configure user prompts via environment variables:
| Variable | Purpose | Default |
|---|---|---|
DOT_AI_USER_PROMPTS_REPO | Git repository URL (HTTPS) | None (feature disabled) |
DOT_AI_USER_PROMPTS_BRANCH | Branch to use | main |
DOT_AI_USER_PROMPTS_PATH | Subdirectory within repo | Root directory |
DOT_AI_GIT_TOKEN | Authentication token for private repos | None |
DOT_AI_USER_PROMPTS_CACHE_TTL | Cache duration in seconds | 86400 (24 hours) |
Supported Git Providers:
- GitHub (github.com)
- GitLab (gitlab.com or self-hosted)
- Gitea / Forgejo (self-hosted)
- Bitbucket (bitbucket.org)
- Any git server supporting HTTPS clone
Repository Setup
Create a git repository with prompt files as markdown (.md) files:
my-team-prompts/
├── deploy-app.md
├── review-pr.md
└── team-standup.md
Or use a subdirectory within an existing repository:
my-project/
├── src/
├── docs/
└── prompts/          # Set DOT_AI_USER_PROMPTS_PATH=prompts
    ├── deploy-app.md
    └── review-pr.md
Prompt File Format
User prompts follow the same format as built-in prompts, with optional MCP arguments support:
---
name: deploy-app
description: Deploy an application to the specified environment
category: deployment
arguments:
  - name: environment
    description: Target environment (dev, staging, prod)
    required: true
  - name: version
    description: Version to deploy
    required: false
---

# Deploy Application

Deploy the application to {{environment}}.

{{#if version}}
Deploying version: {{version}}
{{/if}}

## Steps

1. Verify the deployment configuration
2. Run pre-deployment checks
3. Execute deployment to {{environment}}
4. Validate deployment success
Metadata Fields:
name: Becomes the slash command (e.g.,name: deploy-app→/dot-ai:deploy-app)description: Shows in coding agent command menuscategory: Organizes prompts in documentationarguments: Optional parameters substituted via{{argumentName}}placeholders
Deployment Configuration
Kubernetes (Helm)
Add environment variables via extraEnv in your Helm values:
helm upgrade --install dot-ai-mcp oci://ghcr.io/vfarcic/dot-ai/charts/dot-ai:$DOT_AI_VERSION \
  --namespace dot-ai --create-namespace \
  --set secrets.anthropic.apiKey="${ANTHROPIC_API_KEY}" \
  --set localEmbeddings.enabled=true \
  --set-json 'extraEnv=[
    {"name":"DOT_AI_USER_PROMPTS_REPO","value":"https://github.com/your-org/team-prompts.git"},
    {"name":"DOT_AI_USER_PROMPTS_PATH","value":"prompts"},
    {"name":"DOT_AI_GIT_TOKEN","value":"'"${DOT_AI_GIT_TOKEN}"'"}
  ]'
How It Works
- First access: Repository is cloned to a local cache directory
- Subsequent access: Repository is pulled if cache TTL has expired
- Merging: User prompts are merged with built-in prompts
- Precedence: Built-in prompts take precedence over user prompts with the same name
Error Handling
The feature is designed for graceful degradation:
| Scenario | Behavior |
|---|---|
| Repository not configured | Built-in prompts only (no error) |
| Clone fails (auth, network) | Built-in prompts only, error logged |
| Pull fails | Cached version used, warning logged |
| Invalid prompt format | Prompt skipped, warning logged |
| Name collision with built-in | User prompt skipped, warning logged |
Troubleshooting User Prompts
User prompts don't appear
- Cause: Repository not configured or clone failed
- Solution: Verify
DOT_AI_USER_PROMPTS_REPOis set and accessible - Check: Run "Show dot-ai status" to verify prompt loading and connectivity
Private repository auth fails
- Cause: Missing or invalid
DOT_AI_GIT_TOKEN - Solution: Set a valid personal access token (PAT) with repo read access
- Note: Tokens are never logged; URLs are sanitized in log output
Changes not appearing
- Cause: Cache hasn't expired yet
- Solution: Force-refresh the cache via
dot-ai prompts refresh(CLI), wait for TTL to expire, or setDOT_AI_USER_PROMPTS_CACHE_TTL=0for testing. If you're building a custom HTTP client rather than using the CLI, see the REST API reference for the refresh endpoint.
Prompt has same name as built-in
- Cause: Name collision with built-in prompt
- Solution: Rename your prompt to a unique name
- Note: Built-in prompts always take precedence
Multi-source skills via the per-request repo override
When a single DOT_AI_USER_PROMPTS_REPO isn't enough — for example, you want org-wide public skills from one repository plus per-team private skills from another — run dot-ai skills generate --repo <url> (see the CLI docs for the canonical reference) to fetch prompts from a specified repository for that invocation only, overriding the env-var default. Run the command multiple times — typically wired up as separate agent hooks, one per source — and the CLI tags each set of generated skills with its source so subsequent runs only wipe their own slice.
The override carries more than just the repo URL. A secondary source can live wherever it actually is, via three optional, additive qualifiers:
| Qualifier | What it does | Default when omitted |
|---|---|---|
path (subdirectory) | Load prompts from a skills/-style subdirectory instead of the repo root — the same layout an env-var repo selects with DOT_AI_USER_PROMPTS_PATH. | Repo root |
branch | Pull the source from a non-default branch. | main |
| Per-request credential | Authenticate the override clone with a request-supplied git token (the X-Dot-AI-Git-Token header), so a second repo in a different auth realm (another Forgejo, a private GitHub or GitLab) can be reached without sharing one server-wide token. | Server's DOT_AI_GIT_TOKEN |
Token precedence: when a request supplies the credential header, it authenticates that override clone and takes precedence over the server's DOT_AI_GIT_TOKEN — but only for that request. Absent the header, the override clone falls back to DOT_AI_GIT_TOKEN exactly as before. The token always travels as a request header — never in a URL or body — and never appears in logs, error messages, or the source tag.
Put together, a second source like "the platform team's private skills, kept under skills/ on the team-skills branch of a self-hosted Forgejo" is reachable as a single override — a subdirectory, on a non-default branch, in a separate auth realm — alongside your org-wide public source. The CLI tags each source by its repo URL (the source value), which is not affected by path, branch, or the credential, so the per-source skill slices stay stable across runs.
Under the hood, each invocation talks to the server once and the server still serves exactly one repository per request; composition lives in the CLI, not the server. The exact wire placement of each qualifier — path/branch as query params or JSON body fields, the credential as the X-Dot-AI-Git-Token header — is in the REST API reference.
Unchanged by default. The
path,branch, and credential qualifiers are all opt-in per request. A request that supplies none of them behaves byte-identically to the previous release — same clone target (repo root onmain), sameDOT_AI_GIT_TOKENcredential, same response. And when the override itself is not used, behavior is unchanged: the server falls back toDOT_AI_USER_PROMPTS_REPO, or to the built-in prompts when no env-var repo is configured.
Server-side caveats for this release (the contract is additive, so these can be lifted later without breaking changes):
| Caveat | Impact |
|---|---|
| Single-slot loader cache | Sequential invocations against different repos re-clone each time. Clones are --depth 1, so the cost is small per call, but it's noticeable when alternating between repos within the TTL window. Token-bearing override requests are additionally isolated from the shared cache slot, so a private authenticated clone is never served to another caller. |
| No URL allowlist | The server trusts the override URL. Don't expose this surface to untrusted callers without an upstream gate. |
When NOT to use the override:
- Inside a long-running agent loop that alternates between repos (every alternation causes a re-clone — pin to one repo for the loop and switch outside it).
- As a substitute for
DOT_AI_USER_PROMPTS_REPOwhen you only have a single source. The env var is simpler and benefits from the cache TTL. - From untrusted clients (no SSRF guard in this release).
See the REST API reference for the full wire contract, the source field semantics, validation rules, and response envelopes returned by each endpoint — useful if you're building a custom MCP/HTTP client rather than using the CLI.
CLI-uploaded skill sources (for sources the server can't reach)
The per-request override above still has the server fetch the source. That covers any repository a server-side clone can authenticate to — but not everything. Two cases remain where the developer's laptop (running the CLI) can fetch while the server cannot:
- Sources the server can't authenticate or route to — VPNs gated by SSO / OIDC / device attestation (no static token to hand the server), and managed/hardened clusters with no egress path the operator can open.
- On-disk directories — work-in-progress skills on your filesystem, with no git remote at all (the local dev loop).
For these, the CLI fetches the source locally and uploads it to the server, which caches it and renders it through the same server-side renderer — so a CLI-fetched skill renders identically to one cloned from a repo, with full argument substitution. There is still one renderer, server-side; only how the source reached it changes.
What you run — point dot-ai skills generate at the source the CLI should fetch:
dot-ai skills generate --repo-fetch <git-url>— for a repository the server can't reach; the source is keyed by the git URL verbatim.dot-ai skills generate --repo-dir <path> --source-label <label>— for an on-disk directory with no git remote; the source is keyed bylocal:<label>.
Typically each source is wired up as its own agent hook, so the CLI re-fetches and re-uploads on every hook fire (content-hash-gated, so an unchanged source is a no-op). See the CLI docs for the canonical flags, and the REST API reference for the wire contract — the upload and ?source= render calls, with real captured request/response output.
Identifier conventions and a known limitation:
- The server stores the identifier exactly as sent — it does not auto-prefix or namespace per caller in this release. To avoid collisions between hosts, use a convention like
local:<user>-<label>orlocal:<host>-<label>for--source-label. - Ingested identifiers are global server state: any authenticated caller can overwrite any identifier by uploading to the same one. There is no per-principal namespacing in this iteration — treat the endpoint as trusted-caller-only.
Safety: uploads are size/count-capped (max 512 KiB raw request body → 413; max 100 files and max 256 KiB total decoded payload → 400) and reject path traversal and null-byte paths; credential-bearing git-URL identifiers are scrubbed in every echo, error, and log. See the REST API reference for the full wire format, limits, and error envelopes.
Troubleshooting
Common Issues
Prompts don't appear in command menu
- Cause: Server not connected or prompts capability not enabled
- Solution: Check connection status and server configuration
- See: Deployment Guide for server troubleshooting, MCP client setup for connection issues
Prompt execution fails with "not found" error
- Cause: Prompt ID mismatch or server synchronization issue
- Solution: Refresh the connection or restart your coding agent
- Workaround: Disconnect and reconnect to the server
Prompts work in one agent but not another
- Cause: Agent-specific MCP implementation differences
- Solution: Check agent-specific compatibility notes above
- Alternative: Use a fully compatible agent for prompt-heavy workflows
See Also
- Deployment Guide - Server deployment and configuration
- Tools and Features Overview - Browse all available tools and features